

I have to admit that much of my planning for convention games is centered on imagining all the ways things can go horribly wrong.
This can take all sorts of forms, be it missing figures or components, broken terrain or misfiring gameplay. I have an active imagination and all of these possibilities keep me up at night! Most of these nightmares can be mitigated through checklists and repair kits, at least enough so I can sleep. But really, the biggest source of chaos for convention games is the players and how they’re going to interact with the scenario. It’s also by far the hardest thing to prepare for. Designing a scenario so that it’s robust enough to deal with an assortment of players of differing experience levels and still maintains some semblance of balance is a challenge. And that brings me to the subject for today: Balance.
So what is balance, really? Of course, the easy answer is that each side should have an equal chance to win. Simple, right? However, it’s often a little bit more complicated than that. The assumptions about who your players will be and what they will do have a huge impact on perceived balance. And we all know that players always do what we scenario designers expect them to! So, when thinking this through, you have to prepare for all of the different ways one side might approach the problem at hand and how they interact with all the ways the other side might react.
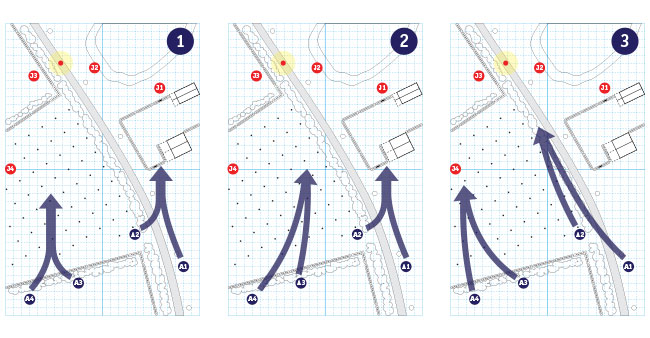
For an example drawn from the current scenario, let’s give each side 3 courses of action. Label them 1-3 for the Australians and A-C for the Japanese for clarity.
For the Australians, it’s pretty easy to come up with 3 different ones. 1 is each platoon attacking straight ahead, 2 is the whole force massing towards the right, 3 is the whole force massing towards the left.
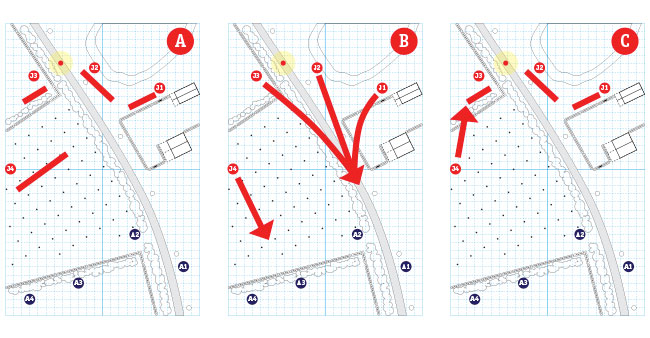
For the Japanese, I think it’s going to be more about posture with A being a positional defense by each platoon, B being an active defense (i.e. Banzai!!) and C being a positional defense by the roadblock and a fighting withdrawal back to the roadblock by the reinforcing platoon.
Obviously, there are lots of other ways to approach this and several variations within each larger course of action, but that way lies madness. That gives us 9 different combinations (1A, 1B, … 3C) the sides could interact in a macro sense and that we have to test to some extent.
Since we are probably not going to get perfect balance across each of these combinations, one of the ways this is an art rather than a science is in how you weight them in assessing balance. My approach is to weight what I feel is the most likely interaction most heavily, in this case probably Aussie 1 vs. Japanese A, as players will tend to pair off without some other incentive to do otherwise. I next look at what are likely the best-case scenarios for each side.
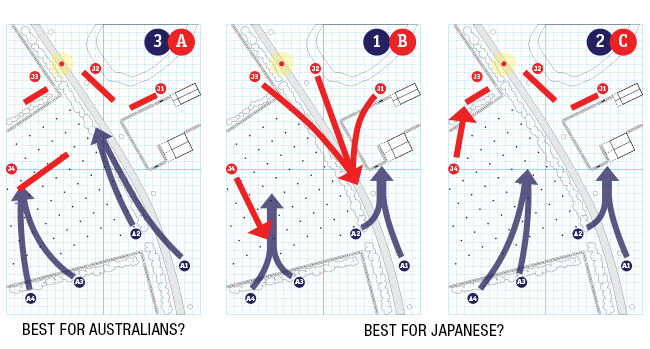
In this case, that’s probably 3 vs. A for the Australians, allowing both platoons to mass on the Japanese platoon on the move.
For the Japanese, the optimum combination is not as obvious. The 1 vs. B combination is directed towards winning through attrition. The 2 vs. C combination is directed at winning through exhausting time and morale. Which one is better for the Japanese is somewhat dependent on how well the Australians utilize their support (i.e. Armor and Mortars). If they are well utilized, then the 1 vs. B combination looks best because it forces a decision before the support can really be brought to bear. If the support isn’t well integrated into the attack, then the 2 vs. C combination may be a lower risk way to win as it will be hard for the Australians to force their way through all those Japanese in time.
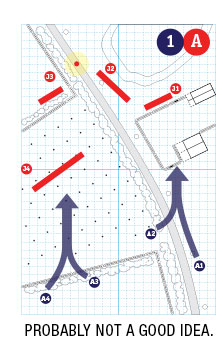
Its not this way for all scenarios, but in this case, the most likely courses of action for each side (1 and A, respectively) not only aren’t the optimum strategy, but may in fact be the worst case choice for their side depending on what the other side chooses. That presents some challenges!
In addition to figuring out how to juggle the optimum strategy for each side and the most likely strategy, you have to figure out how to weight optimum strategies when they produce different levels of advantage. Say, for example, if the optimum Japanese strategy gives a small advantage but the optimum Australian strategy gives a large advantage (or vice versa). An even more challenging variant of this is when one side’s decisions matter more than the other side’s decisions in determining the winner. For example, in some scenarios, an option might be the RIGHT ANSWER and give a relative advantage of some degree against any option the opponent chooses. In its most extreme form, that’s a single-sided tactical problem rather than a two-sided game, but lesser forms are completely game worthy, albeit trickier to balance.
Another consideration, and one that will come into play in the current scenario, is player experience. Some scenarios are quite sensitive to player experience, with “how a side attacks” mattering even more than where or with what they attack. With this scenario, the utilization of the Australian armor, the level of infantry-armor cooperation and the scheme of fires with the off-board mortars are very important to Australian chances to win, but are advanced skills. There’s a bit of risk involved in including these features in the scenario, but its one of the attractions of this situation for me. Regardless, this is something you need to make an assumption about when you are assessing relative balance.
If, after you’ve weighed all of the different options, balance isn’t where you think it should be, then there are several ways to address that. For example, I often play around with the number and positioning of Jump-off points, the force morale of each side, support units, entrenchments and special rules in effect. In some cases, adding terrain, moving terrain or changing how we play a particular type of terrain are options that we consider. There are many levers to effect both balance and player behavior. I’ll end up talking more about these in a different post, but there are plenty of ways to change the balance of the game based on testing.
One of the other things that needs to be accounted for at this point is “Crazy Ivan” proofing the scenario. Sometimes, there’s a decision that a player can make that will derail the entire scenario for everyone. The best example of this is losing a key asset before it can really influence the action. In our last Russia scenario, one player has a mass of green partisans and one elite SMG squad, so squandering that elite squad can have consequences. Likewise, in this game, deploying the Australian Forward Observer unsupported so that he can be easily shot would have major consequences. I try to identify these potential problems in play testing and then mitigate against them through guidance during the game. For example, my pre-game briefing will mention potential problems as “These are BAD things — Try not to do them!” and I’ll ask “Are you SURE you want to do that?” during the game. Usually, this is enough to keep things on track. There’s no way to ensure against multiple bad decisions, but these prompts help maximize the number of “good games” I get out of running a scenario.
For better or worse, games are probabilistic exercises and even if a player does everything right, things can still goes wrong. That means determining what your actual balance level is can take a fairly large number of plays to figure out. See sampling error and polling to get some idea of how difficult it can be to get to the underlying reality of a situation. More testing is always good, but all you can really do is narrow down the range you are operating in.
After all of this consideration, the final question is what level of balance is “good enough” for a convention game? Of course, we would want each side to have an equal chance to win. In practice, I think if I come out no more than 60/40 then that’s just fine, especially for its first convention. Learning lessons and tweaking the scenario after each show can improve the balance over time, but that’s a post for another time.