So now for the thing we get more questions about any other…the mat.
There are lots of ways to make a mat and I’ve tried most of them. No one way is better or worse. It’s really what you like and the effect you’re after, and maybe your personal skill set.
Here are a few write-ups for methods different from mine:
-
John Bond paints fabric actual fabric with hills underneath.
-
1000 Foot General builds what I call tiles and does a beautiful job.
I use what I call the I-95 Method cause I picked it up from the loose association of guys living and playing in Northern Virginia. We first met them in our Flames of War days and after we moved to Virginia, Ed started playing regularly with them.
This method uses spun bond, polyester-fiber, landscape fabric as a base for latex house paint and flock. This stuff is not real woven or knitted fabric. It’s thin, stiff, has a swirly grain and feels more like paper than fabric.
Pros:
It’s cheap, light-weight, reasonably durable, can be rolled for storage, uses the same flock as hills and terrain pieces so the match is good, doesn’t stretch when wet, and comes pre-cut to 4” wide.
Cons:
The fabric is porous (Duh) so can be messy to work with and isn’t really a one person job, outdoor work probably required, you can only put so much paint on it, the material has a texture that comes through the paint, and it can crease if folded so requires storage in a roll or flat.
The main reason I use this method is the flock.
I love photo fleece but I love texture more and flock gives me texture. Plus, we spend a lot of time thinking through lines of sight. Hills under fabric make it hard to get all the angles the same each time and require Ed, not the artist in this partnership, to artfully arrange fabric since I don’t go to cons very often.
But mostly it’s the flock.
For more monotonous environments like desserts or snow I think I would paint regular fabric but Ed hasn’t been as interested in those theaters. So for now…for my fancy-dancy boards I keep coming back to making my own mats and I keep coming back to the I-95 method.
Or rather, the modified I-95 method.
The guys keep a 4’ x 6’ sheet of pink foam board in one of their garages and use that to paint on top of but I don’t have a garage or anyplace else to stash a sheet that big. They lay the landscape fabric on the board, slap on paint, throw on flock, peel up the mat, and toss it onto the grass to dry in the sun. The grass makes a great drying rack but I don’t have a decent lawn either. But why should that stop me… or you?
You will need:
- A flat, smoothish place to work the fabric that’s at least as big as the final mat.
- Another flat someplace to dry the fabric flat between paintings.
- 1 – roll of spun polyester landscaping fabric (may be called Driveway Control Fabric in England)
- 2 – .75” x 1.5” boards that are a few inches longer than your board will be wide
- A staple gun (and staples)
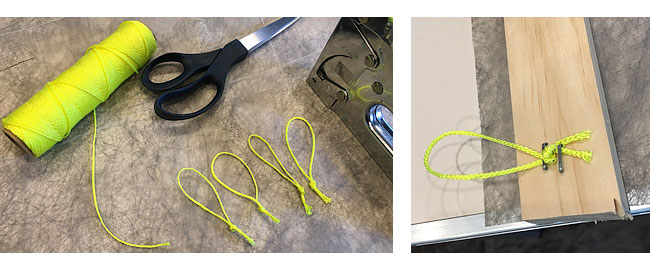
- Some cord or string
- Soft chalk or pastel in a light color
- A charcoal pencil
- If you’re doing a full size mat it’s a good idea to have help when you move it wet.
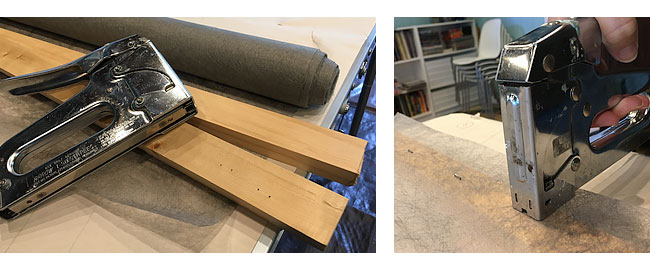
Square the first board to the fabric leaving a few extra inches hanging past the board and staple the fabric to the board.
Add 8”-10” inches to the total length of the mat and staple on the second board. Make sure you staple both boards to the same side of the fabric so it’s easier to manage.
With the boards you now have a convenient way to hold on to the mat. This will help a lot later when it’s painted and stuck to whatever’s beneath it or you’re trying to maneuver it through a door.
Now mark the edges of the final mat on the fabric. I use pastel, which is a little softer and easier to use than chalk. You can usually buy it by the stick at an art supply store.
Add some loops of string for tie-off points like these.
Time to trace. Slide the Mock Up under the fabric and good luck seeing anything.
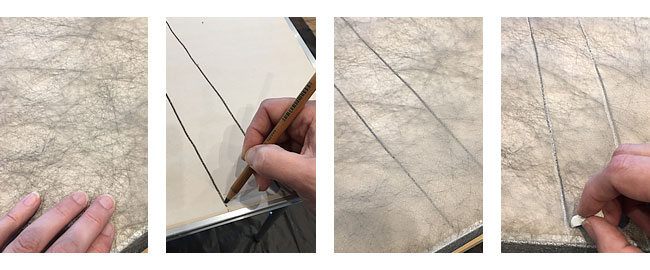
Take the charcoal pencil and trace over the bits of the Mock Up you need to see through the fabric: roads, paths, etc. I use a charcoal pencil on the Mock Up because a marker would probably bleed through the paper and make a mess on my table. I use pastel on the fabric because marker would probably bleed through the paint I’m about to apply.
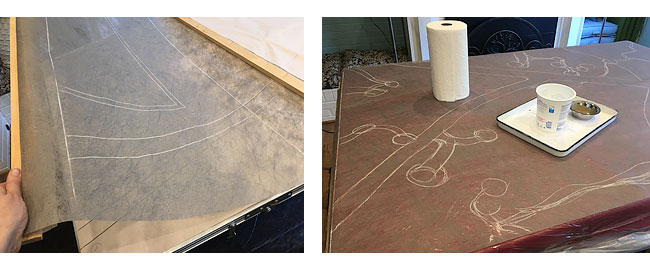
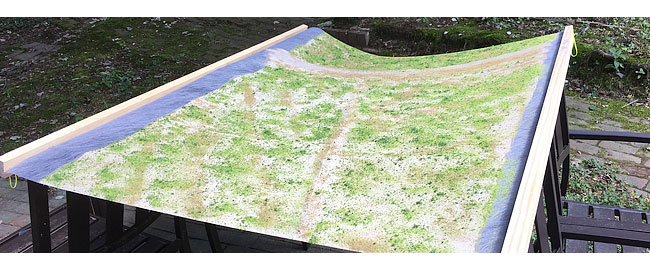
The picture on the left is the small mat for this project but I wanted to show you the full size mat from last year’s Russian build on the right. Same process except one’s bigger.
Almost ready to paint but first, I have to get my table ready.
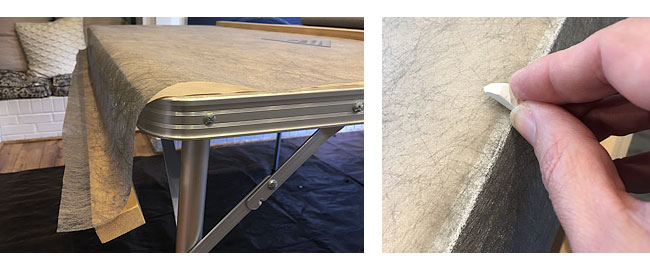
Our game tables fold away, and I love them, but those seams will leave an impression on the mat if I don’t take a few precautions.

I pad the area with an old blanket and then cover that with plastic. Then tape it all down securely. Be aware that even creases in the plastic can make patterns in the paint and flock. I’m looking for texture and don’t mind this, but if you want to avoid it use a plastic drop cloth without folds and creases or get a big flat sheet of foam like the I-95 crew.
Now I paint just the areas that I don’t want to flock. Be sure to paint past the edge line.
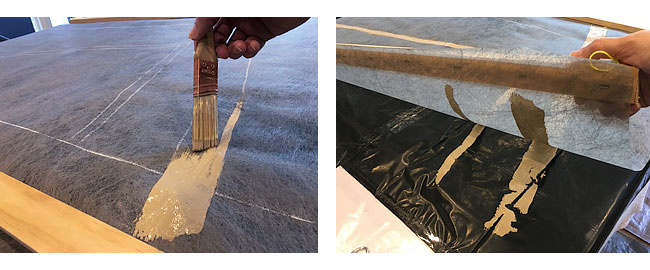
See the mess it makes. It’s like screen-printing.
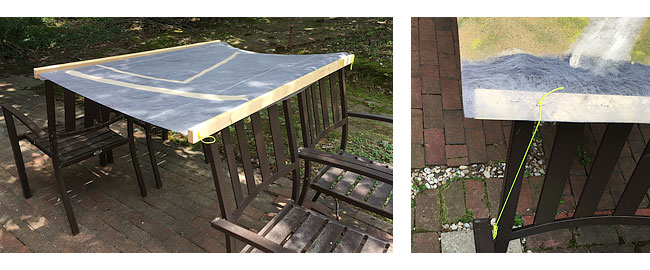
This is my solution for drying. I stretch the mat between our outdoor chairs chairs and let it dry outside. This mat is small and the boards are enough to hold it in place but I have to tie off full-sized boards. The image to the right is the Russian board tied off last year.
Once it’s dry, the mat comes back inside and I start working on the flocking. The paint is the glue here so I paint on a thick layer and start sprinkling. When I’m done the mat goes back outside to dry again.
Once it’s dry…again, but before I bring it in, I seal it.
First, I brush the loose flock off the road and anywhere else it shouldn’t be. Then I spray on a 2:1 mix of Distilled Water and Alcohol. Then a mix of PVA, water and alcohol. The Alcohol spray dampens the flock and breaks the surface tension so that when the glue goes on it flows into the flock instead of sitting on top.
When that’s dry it comes back inside for highlights.
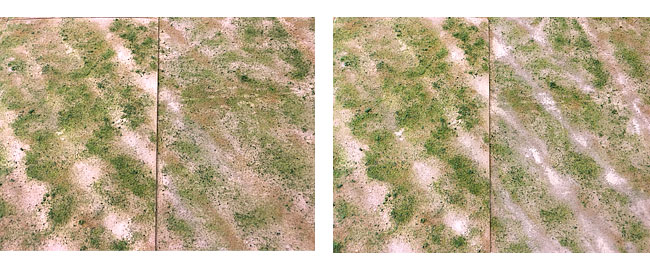
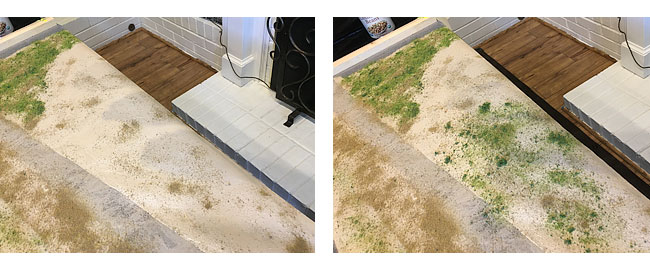
On the left you can see the tile and mat before the mat has been highlighted. On the left is after the mat has been highlighted. As you can see the tile and mat never match exactly because the materials will always take the paint differently. But once the rubber trees are standing across them the difference will not be very noticeable.
The fabric is probably full of paint now and the highlights probably won’t leak through but I still work on top of plastic, just to be safe.
When you’re satisfied and it’s all dry, trim off the boards and save them for next time.
I left a long lead under the tiles and I normally leave 3 or 4 inches beyond what I need on each end so that there’s a little extra fabric to protect the edge when it’s rolled up. I used a Sharpie to draw a line on the board edge of this mat because the scenario has the Aussie players measuring from that edge but normally I don’t bother. The actual table edge is good enough.
If you want a clean edge take a sharp knife and a long straight edge and cut off the excess. This is where painting past the edge pays off because you’ll get a cleaner looking trim.
I have a collection of heavy cardboard rolls that I roll these up on for storage and transport. I pack 8 clothespins in the box when Ed takes these for a Con. If he clips the pins on the ends of the mat when he sets up it’s just enough weight to pull the curl out of the mat.
And that’s it. Trees next time. Have I mentioned the trees?
Interesting take on the gaming mat and nice results.
cheers John