
We have a pile of foam…pink foam, but what we want is hills and countryside so lets talk surface.
But before we jump into that I need to add a little more structure because I have big hills that we want trees to stand on…58 TREES…and unless I want them broken immediately, or at least very quickly, I need a way to stop them falling off the table. They can’t be permanently attached because that makes the board a pain to store and play through and if I did that the…58 TREES…couldn’t be reused on another board. So…obviously, I’m gonna use magnets.
I’ve done this once before on our Corinth board but it was a little different. For that project I embedded magnets in the trunks of 5 trees instead of basing them and then put magnets in the foam. It looks great and the magnets grip just enough. But those 5 trees can’t be used for anything else…cause no bases. So if I want reusability for…58 TREES, they will have to be based. The washers I use for basing stick to magnets so that’s good but the question is, how big do I need the magnets to be? If the magnet is too weak it wont hold the tree but if it’s to strong it will rip out of the foam. If I had time I would order a few sizes and experiment but I don’t so I rummage through my magnet drawer…what you don’t have one of those?…stack up a selection of .25” wide magnets and see how many it takes to hold the tree securely through four layers of paper towel. And that’s what I ordered, 25”w x .25”h magnets. NOT A IDEAL METHOD and spoiler alert, the magnets will be too strong and I will be making repairs as Ed playtests on the partially finished board. I had a choice between 2 strengths of magnet and did not choose the weaker, cheaper magnet…Alas. But lets move on.
So I have 58 holes to make in the foam. If only I had a fancy, hot-wire tool…oh, I do.

My new Hot Wire Foam Factory Router is perfect for this. I bent a wire for the hole width and depth and had a field of holes in minutes. A few caveats: 1) the wire is long and wobbly so I wore a leather glove to steady the wire, 2) don’t try to rotate the wire to get a round hole it’s just not worth the trouble, put the round magnet in a square hole. And don’t use PVA, nope, don’t do that cause still making repairs. Use cyanoacrylates.
So moving on, lets talk surfacing. I don’t think I do anything revolutionary but lets discuss.
I use spackle, specifically, I use DAP DryDex Spackling cause other brands feel too sticky to me. I’ve been thinking about switching to wall compound cause…cheaper, but as time for this project was limited I didn’t want to introduce anything new. I thin the spackle with water till it’s creamy and spreads easily and then I just use my hands to coat the entire surface. This smooths out the roughness that sanding didn’t get but most importantly it protects the foam from any chemicals that might eat it…you know, like primer? I do not stress over a perfectly smooth surface but if there are finger marks or ridges in the spackle I wipe it with a wet brush or just my hand. I save perfection for home improvement projects and my walls. After it’s dry, I sand the edges a bit to take off any lumps and move on.
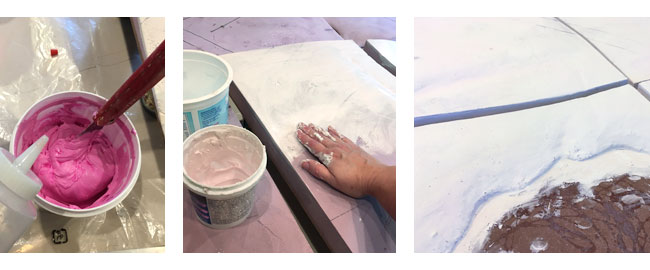
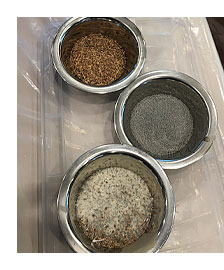
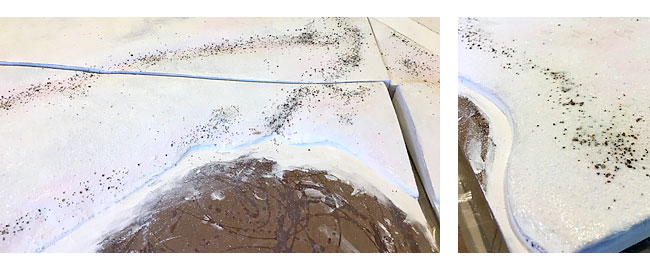
Now we need a tough skin to protect this thing from scratches and light dings. I mix PVA and water till it brushes easily and apply a thick coat to the piece. Then I sprinkle the piece with sand and ballast. I use three grits: Games Workshop Modeling Gravel, Woodland Scenics Fine Ballast and whatever fine sand I find at the craft store. I keep the mixed up excess that falls off and reuse that too.
I had a shaker full of natural-colored, fine sand that I’ve been using for years but it’s disappeared and I could only find bright, white at the last minute so it’s a lot harder to see the fine sand in these pictures than it should be. But trust me the entire upper surface of the piece is covered with at least fine sand. If an area looks like it would wash out or be less traveled I use more of the larger grit. A lot of this texture will be lost when I flock but you can never be sure exactly what will show so I don’t try to guess.
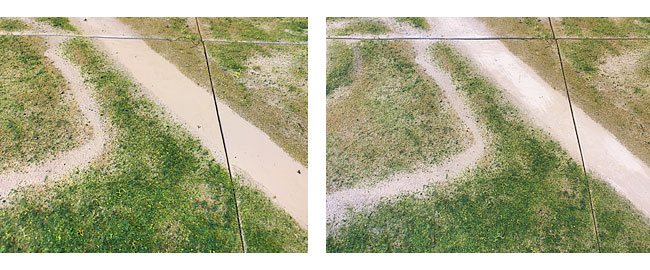
For this project I kept tiles next to each other as I worked and carried patterns across the seams. The idea is that the 6 ties should come together as one thing so watch what happens between them. Purposefully crossing the tile edges with texture helps lead the eye away from those edges. This will be especially important for flock and highlights.
When I’m done I make sure to wipe the edges with a damp paper towel before a rocky glob of glue forms somewhere inconvenient.
Next comes paint and flock.
I use a standard paint color as my ground base. It’s Home Depot’s Behr Premium Ultra in flat. I think the color is (PPU7-5) Pure Earth. It’s a nice neutral light brown I can lighten to make a place look dry or darken for mud. Problem is, as I study Street Views of the real place in Malaysia I see clay…red clay that looks nothing like my ground base.
I could layer on red to match the real location but I normally flock lightly in forests and groves, about ¾ of this board, which makes the base color on the tree bases important. If I redden up the rubber tree bases they wont match future boards. Plus, I have to use trees and bushes for this project that were already produced with my ground base. If I go red for this board those won’t match. SO…yep, I will not be matching the real location’s dirt but I can do a little better with the flock.
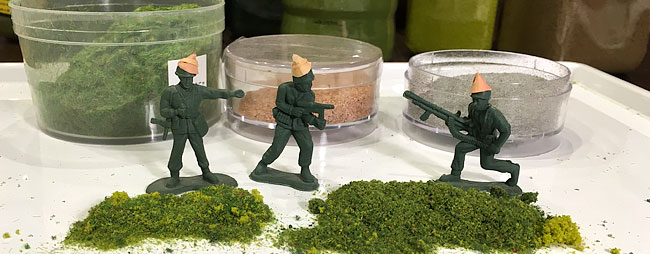
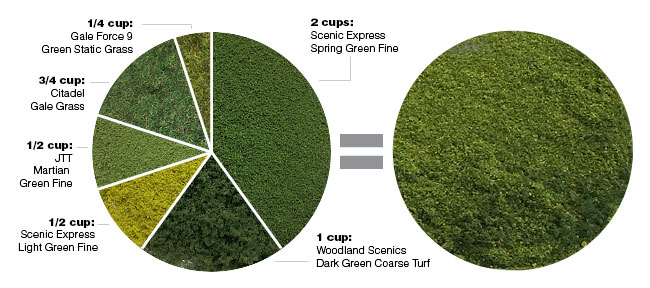
As I look at the Street View and period photos I see lots and lots of grasses. I don’t like using static grass on game boards because figures, players and storage take a toll on anything fluffy. So I’m not going that way, but even if I did, in the era we’re modeling folks tended to keep groves clear of grass, and again ¾ of the board is rather bare. I can try matching the color and that is green…bright green. I got lucky on the Russian board last year and found a Scenic Express blend that was just what I wanted but not this time so I’ll make my own.
I’ll use this blend around the swamp and buildings. For the woody areas I’ll use one of my standard combinations and sprinkle in some of the Malaya blend. The standard mix I use for most individual terrain pieces is: Scenic Express Earth Blend, Woodland Scenics Burnt Grass Fine Turf and Scenic Express Light Green Light.
My method for applying the flock is a little different. I use this method because it’s the same way I flock the mat and that helps the two things blend together.
First, I paint the areas that will not be flocked with my base color: tile sides, roads and worn spots. Then I paint the borders between areas that will be flocked differently. That second part is just for reference so I can keep track of what goes where while I work.
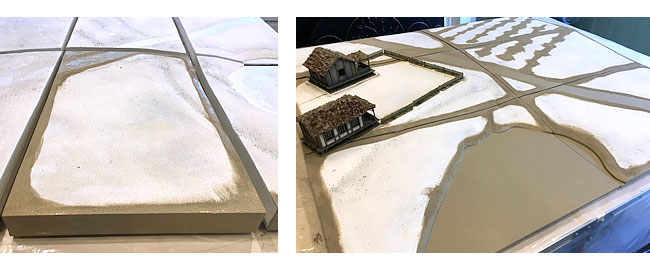
After all that’s dry I start blocking areas with a heavy coat of the ground color and sprinkling in the flock. The paint is my glue here so I work my way around a patch at a time so the paint doesn’t dry before I get the flock on it. Flock doesn’t stick to dry paint so the road and any other areas you don’t repaint stay clear.
No, it’s not that simple. I flock the same way I paint, blending as I go and varying how heavily I apply. Lighter colors and applications on the high spots and darker on the lower. Thinner greens near worn patches with heavier earth to fill in. I use the same colors across the whole board but vary the proportions. In fields, green is dominate. In woods, brown and yellow is dominate. I like the effect but it’s also useful for defininting terrain types and areas cause this is a game and players want to know where the edges of things are so they know how far they can see…and be seen…and be shot. So I make clear, definite divisions between terrain types with flock. It doesn’t feel unnatural because inside the different zones the application is natural feeling and I hide the divisions under bushes and fences.
A good looking board is about layering really and this is just the bottom layer of the board.
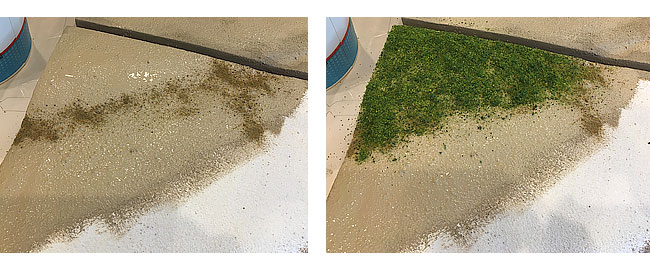
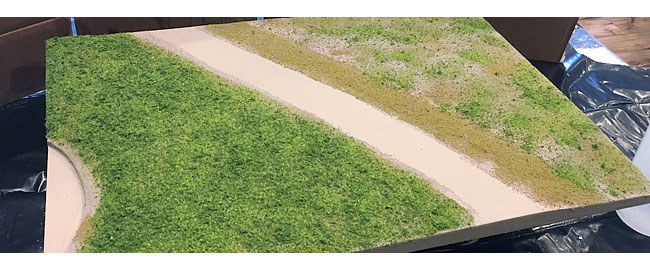
Here you can see the three different terrain types defined with flock on this board: green open field, brown Border Terrain and patchy trees or grove.
But we’re not done yet. At this point I always hate the boards. They feel dead to me but it doesn’t take a lot of work to change that.
Now I highlight.
I take my ground base color and mix it about 50/50 with white and dry brush that onto the roads, paths and bare patches. I carry that into the flock and without a lot of work the piece begins to pull together for me. I think this softens the transitions just enough that the eye begins to read the piece as one place instead of a collection of parts. When I did the Corinth board I dry brushed the whole mat to get a dusty Mediterranean feel while the Russian board only got highlights on the roads and paths. If you want it to look wet use a wash instead of a highlight but always let it blend into the flock.
Create texture and then blend.
Next time I’ll tell you about the mat.